Sunday, August 29, 2010

Reusable Sandwich Bags

This is a project I've been meaning to get around to for a while.  Reusable sandwich bags. 

The thing is, once I started looking at ideas and researching fabric possibilities, it all got kind of complicated.  The pattern, not so much, but you would not believe all the controversy out there over which fabrics should or should not touch your food.  I am not going to make you suffer through the hours I spent reading these bitter online discussions.  Instead, I'll give you a link to the one site that seemed to sum them all up and from there you can make your own choices, like I did.

I went with cotton prints for the outside and rip-stop nylon for the inside (with the shiny, coated side away from the food).


But I also sort of made up my own pattern just like I always do.  I knew I did not want velcro closure on them like the majority of the ones sold out there have.  Why you ask? 

Picture this: there's a 35 year old woman sitting in a class room with maybe 20 other students, 90% of which are about 25 or so and none of which have children or had to get up a some ridiculous hour so they could commute 2 hours to get to class in the first place.  This woman decides to reach into her bag and pull out a snack to try and keep her brain functioning for the duration of the 3 hours she needs to sit there.  Do you think she is going to rip open a super loud velcro sandwich bag, thereby attracting  all sorts of unwanted attention?  Or do you think she will sit there for the next 2 hours thinking about the food in that bag and how it is so close, but just out of reach?

Right.  No velcro.

First I tried using buttons and a hair tie to make a closure.  That worked in theory, but not in practice.  The bags just wouldn't have stayed closed unless they were totally full.  So then I realized that they really didn't need to "seal," they just needed to keep the food in not let in much air.


So I just made it like a regular, pre-ziploc, totally old-school, fold over sandwich bag.  And it works.  Perfectly.


Here is one of the bags with the top folded open.  You just fold it back over itself to close.


All I did was cut 2 pieces of the cotton fabric and 2 of the rip-stop nylon at 7" x 8.5".  With right sides facing and a quarter inch seam (I am a quilter, y'all), I sewed around both long edges and one short edge (basically making a pocket).  I clipped the corners.  Then I turned the nylon pocket so that the "inside" part was now facing out and inserted it into the cotton pocket (so the right sides of both were together).  I aligned the top edge and sewed around it, again with a quarter inch seam, leaving a couple inches open to turn the fabric.  I then turned the fabrics and realigned the nylon pocket inside of the cotton one.  Then I topstitched twice along the top edge of the bag.  The last step is to fold the top of your pocket down, roughly about 2 inches (I eye-balled it every time) and stitch the edges down as close to the edges of the pocket as possible.

It's a little tricky trying to figure out which side of the nylon is the coated side.  It's the side that is shinier.  With the black fabric it was fairly obvious, but I could only tell with the orange fabric when it was held to sunlight.  You can also feel a difference between the two sides (the coated side feels more like plastic, while the uncoated side feels like fabric).

By the way, I went to JoAnn's for the fabric.  Not exciting in and of itself, BUT that was officially the last time I will be going there until October.  Why?  I'm so glad you asked!

Because I am a...


I will be participating in Stashbusting September, hosted by Robin over at The T-Shirt Diaries.  That means that for the entire month of September, all the lovely crafts I will be making and sharing with you will be made entirely from my current stash of fabrics and supplies.  You can get all the specific rules, if you follow the link (buying craft supplies for business use is permitted).  And other than the stuff I bought for this particular project, I did not go out and start stocking up on supplies.  That means that sometime in the next week or two, when I get around to making some reusable lunch totes, they'll be made out of my stash.

I'm actually pretty excited about it, because I've sort of been doing that already all summer (with not quite as strict rules, of course).  Any challenge that encourages me to buy less is a good one in my book.  I promise I will resist the temptation to use all of those lovely coupons that JoAnn and her friends send me every couple week.  For the entire month of September. 

So.  Do you think your stash can handle the challenge?

Well, I'm off to go make some more sandwich bags.  I need to make a big pile of them because not only are both my husband and I packing lunches these days, but one of us can only remember to bring home those bags about once a week.  I love him anyway.  :)
Thursday, August 26, 2010

A Big Week

I'd like to start off by welcoming all of my new followers... 

Welcome!  So glad you're here!

I tell you, if you want to up your blog traffic and simultaneously fill your inbox, give a quilt away!  And just in case you were wondering, if by chance I reach 200 followers in the next few days, I will not be able to give a second one away for the occasion.  :)  Seriously though, reading all of your comments has been lovely... there are some pretty cool people in blogland.

In other news, my recycled bird seed bag was featured on Creative Itch, Cheap Chic Home, Beyond the Picket Fence, and House of Hepworths!  I'd like to thank the Academy!  I can't tell you how thrilled I am at how well-received the bag was.  I hope to make myself another one soon, but in the form of a messenger bag.

AND, I made a label for your quilt...


Earlier this afternoon when I started the project, I had plans to walk you through how I made the label.  I took all the pictures I needed as I went, step by step.  I printed the image I wanted onto a piece of fabric that I had ironed to an 8.5 x 11 sheet of freezer paper.  Thought the printing looked great and I cut that label out and stitched it on by hand and then sorted out all those great action shots of me going through steps.

Then I sat down to write up my post and decided to google printing on fabric to see if there were a ton of tutorials on this or not... only to find out that apparently this method isn't as permanent as you might think unless you use pre-treated fabric.  Opps!  That's what I get for "making it up as I go."

I did some testing on some other pieces I made the same way and it looks like the black ink won't fade much at all after washing, but that cute little "button" image I decided to throw in there will fade a bit because it's mostly colored ink.  Printing directly to fabric like that will work for that art quilt I am working on, though, because it won't be washed - just hung on a wall. 

So your quilt will not be quite perfect.

But it's still a free quilt.  With a label.  :)

Monday, August 23, 2010

100 Follower Giveaway - or Should I Say QUILTAWAY!

I've been looking forward to this post for a little while now.  A couple months ago, I realized that within my stash I had a group of fabrics that accidentally went together beautifully for a quilt and decided that I would use them to make one for one of you.  With time running out before school starts for me, I knew it had to be on the simpler side and this is what I came up with...


I named it Over the Garden Gate.  The white bars remind me of a fence and the color combinations remind me of a flower garden.  I also was trying to capture the feeling of how, as we click our way through blogs and link parties, it can feel like we are peeking into someone else's craft room or living room or kitchen - just stopping by for a minute to chat before heading out to the next link down the street.  There is a sense of community out there that I just wasn't expecting to find at the outset.

I all but stumbled into blogging at the end of May, basically deciding I wanted to do it because I found out there was something called the Blogger's Quilt Festival.  What I could not have known was what a warm, generous and creative group of people I would find on my travels through blog-land and how the very act of blogging itself would push my creativity and give that part of my life focus, definition and goals.  As I was cutting and sewing and quilting this quilt, I was thinking about the many comments I've gotten from some of you on my various projects, your insights into your own crafts and some of the beautiful things you guys have made and shared on your blogs.  It is amazing to me how we just keep putting ourselves and our projects out there and how often someone has something lovely to share with us because of it.  This quilt is for each of you, even if I could only make one.


On a personal level, it's nice to finally have a group of individuals that are truly interested in all of my crafts and not just humoring me because I just dragged them up to my craft room, again, to show them things that they just don't get or can't understand the amount of hours I just "lost" creating whatever it was.  I thank you and my friends and family thank you.  :)


I decided to give the back a little interest using some of the scraps from the top.


The quilting is difficult to see in photos since it is white on white, but it's an all-over meandering pattern.  I originally planned on quilting it more tightly, but I used a higher-loft batting and I thought it looked better more widely spaced.  I finished the binding by hand. 

The quilt measures 62" x 76". 


This quilt is washed and ready to be sent to one of you.  It still needs a label and I promise it will have one before I send it out.  I just haven't decided what I want it to say yet.

Thanks for reading my blog and a special thank you to all of my followers - you make blogging fun.  :)

Here are the giveaway quiltaway rules...

You have 3 chances to enter.  Each comment is considered an entry (no more than three per person):

1. Leave a comment about this quilt or what you might do with it if you win it or about what blogging has meant to you.

2. Become a follower.  Just leave a comment, whether you're a new follower or old, just saying that you are one.

3. Blog about this quiltaway or post one of my buttons (located in my sidebar) on your blog.  Let me know which you did and post the link in the comment.

Please make sure there is a way for me to contact you by email!  This quiltaway will run from now through Sunday, September 12th at 6:00pm.  The winner will be drawn by random number generator and announced Monday, September 12th at 9:00am.

GOOD LUCK!!  I hope YOU win!

Linking up to Atticmag's Giveaway Friday.

Thursday, August 19, 2010

Projects, Peeks and Plans

A big week for Craftopotamus.  My bird seed bag was featured on Tater Tots and Jello, Under the Table and Dreaming, So Very Creative and Craft Gossip.  Thank you, thank you, thank you!

Wow.  The bird seed bag also helped to bump up my number of followers faster than expected (and I want to be clear, that is NOT a complaint) so I've had to resort my project urgency list so that I could focus on my 100 follower giveaway... we're not there yet, but it's definitely within reach.  Here's a sneak peek.


I also FINALLY started an art quilt.  No more talking about it, I just jumped in.


Not much to look at yet, but you've got to start somewhere, right?  And I had fun learning how to use my printer to print onto fabric - way easier than I thought.

I also had a lovely follower ask me for a copy of one of my quilt patterns, Wright's Windows.  Which is awesome and flattering, but somehow I have to turn this...


... into a legible quilt pattern that someone other than my math-loving self can understand.  It'll be a good exercise for me.

Also made some progress on my Quilts of Valor project...


And then there's this...


"What's THAT?" you ask?  THAT is a pile of textbooks, my friends.  I start my masters in Urban Planning this coming week and am scared to death about it.  Silly, I know, but just look at those books, invading my craft room, looming over my fabric, pushing aside my iron... 

So, again, big week for Craftopotamus.  And if you're a regular reader that hasn't actually clicked the "follow" button yet... come on in, the water's fine...  :)

Monday, August 16, 2010

Canvas with Wings and Collage Art

This was originally a guest post that I wrote for Michele at The Scrap Shoppe last week...

A couple of months ago I redesigned my craft room and made this piece of art for my wall.


I wanted to put art on the walls that would inspire me so I looked up tons of inspirational quotes. When I found this quote from Emerson it really hit home. And as I read all those quotes I felt uplifted and wanted to try and show that feeling of soaring on inspiration. I started with a canvas and knew from the beginning that I wanted it to hang from a corner rather than the usual direction. I painted it with some acrylic paints, then decoupaged the quote on top. I used craft wire to shape the wings and then hot glued them to the back. I sewed on a layer of tulle and another layer of a sheer lining and then glued a whole bunch of feathers around the outside of the canvas.
My sister loved the quote and asked me to make her one for her office, but a canvas with wings wasn't quite right for her or her office. She also wanted something that she could frame. So after some thought, I came up with this...


It's mixed media: water color, oil pastels, paper collage, paint markers and gel markers. It wasn't as complicated as you might think... you just need to "build" it in layers.
I started with a 12"x16" piece of water color paper and marked off the edges so she could mat it to 11"x14" easily. I played with some water color paints just to start some colors for the background. If you don't have paint, you can start with any great scrapbook paper. Then I copied out the quote in a word processing program and played with the size and font until I was happy with it. I printed it and cut out the words ransom note style and the found some awesome images from The Graphics Fairy. Here you can see the quote and images at this point:

Once I was happy with the layout, I used a glue stick to glue it all down with a few more random pieces cut from magazines and catalogs.
I added some depth to the background with some oil pastels, but you can use markers or crayons too - whatever you like. Just play.

To finish it off, I had fun with some paint markers and gel pens and VOILA!

Saturday, August 14, 2010

Recycled Bird Seed Bags

Sometimes I'll get an idea for a project and then get side-tracked for one reason or another.  I usually get back to them... eventually.  This particular project started as an idea two Earth Days ago.  I think I was just a little daunted by how I was going to pull this idea off. 

So it was Earth Day 2009.  There was, of course, a big push to use reuseable bags instead of plastic ones and I kept coming across these neat bags that were made from recycled rice bags. 

Well, I don't buy rice in quantities of bigger than, say, 2 pounds.  But I do buy 20 and 40 pound bags of bird seed regularly and those bags are made of that same nylon mesh stuff that you can't just recycle the usual way.  Now some of these bags are really pretty... here are a few examples.


I got the idea to use the bags as you would fabric.  And I also wanted to see if I could create something slightly more fun than a bag to just haul groceries in.  I already had a pattern that I liked - the Bella bag by Monica Poole.  I bought it online from Henrietta's Handbags.  I wanted to use a second fabric in the pattern to break up the pattern a bit and figured burlap would make a great contrast.  I found the lining fabric in the remnant pile at JoAnn's.  After that I just basically followed the pattern, except I did not use any Pellon or press any of the seams because I was afraid of melting the nylon mesh (and I really hate to iron, period).


Here's the back...


Oh, and there's my helper!  Always ready to sneak into a shot.

I used one of those neat recycled buttons they have at JoAnn's now.  I love how they're almost textural.


Now I don't see these as becoming quite so popular as the feedseed prints of the '30's, but I do look at the designs on the bags when it's time to buy a new bag of bird seed.  You can adapt almost any bag pattern to work with this stuff and it's free material if you're like me and keep your bird feeder stocked.  It would also make for great reusable lunch bags or totes.

Hope I gave you some ideas!

Friday, August 13, 2010

The Versatile Blogger Award!!


When it rains, it pours!  Not only did I receive my first blogging award today, I received TWO Versatile Blogger awards!  One from the ever-lovely Sally at Sally's Journey with Lapband Surgery and the second from Ginger of Support Blog for Moms of Boys!  Thank you, thank you, ladies!  You and your blogs are both fantastic!

And now...the rules.


Thank and link back to the person that gave you then award. Done and done.

Share 7 things about yourself.

1. I am a Taurus.
2. I have been married to a wonderful man for 5 years.
3. I have one 20 month old and super rambunctious son.
4. We have a dog and a cat, both rescues.
5. I am starting back to school in a couple weeks for my masters.
6. Dunkin' Donuts coffee brewed at home with some hazelnut creamer is what gets me out of bed in the morning.
7. I currently have two healing burn marks from my most recent endeavors with my hot glue gun - we have a love-hate relationship.

Pass the award to 15 blogs you love and enjoy!
Here are just a few of my favorites, in no special order:

1. Ann @ Make the Best of Things
2. Melissa @ Those Northern Skies
3. Missy @ Marvelously Messy
4. Michelle @ Michelle's Romantic Tangle
5. Wanda @ Exuberant Color
6. amieggs @ amieggs
7. Megan @ Fowl Single File
8. Kim @ Cheap Chic Home
9. Christina @ Moment to Moment
10. Sung-Hee @ Sung Hee Regina Hong ISM
11. Brittany @ Unexpected Surprises
12. Anu @ My Dream Canvas
13. Betty @ My Mink Betty
14. Andi @ Patch Andi
15. Rossie @ r0ssie

Let those blogs know they've been given the award. On my way...

Oh, AND my fabric covered journal was also featured on Keen Inspiration's Friday News Flash.  Thanks a ton, Sharon!  Your blog is awesome!

Tuesday, August 10, 2010

Muddy Prairie


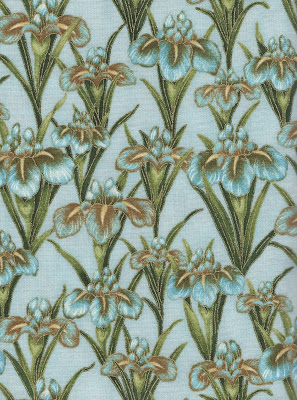
It all started with a fabric. Two years ago, while at the International Quilt Festival in Chicago, I found this fabric:

It's just irises, right? Well, yes... but, there's more to it. I love irises, not just because they're a beautiful flower. I love them because when I was little, maybe around ten years old, my best friend and I would play in this abandoned field, affectionately known as "the Prairie." The pair of us had vivid imaginations and invented an entire fantasy world there, complete with magical quests, spells and evil sorcerers. We played there for hours at a time.

Every spring, as the snow melted, the Prairie would flood with melt water and, in the middle of what seemed like a lake of puddles, a bunch of wild irises would bloom. We would forge our way, as best we could, over logs, hurdling puddles, searching out the driest spots, until we reached those flowers. We would pluck one or two each for our mothers and then attempt to extricate ourselves from the mud. Invariably, we came home with mud up to our knees. I remember stamping my velcro shoes all the way down the block in order to get as much mud as possible off, but always managed to track it in the house.

So irises always make me think of this friend and those days and the Prairie. I knew when I bought the fabric that I would eventually make her a quilt. I started collecting fabrics around that one. I tossed over many pattern ideas and eventually realized that I needed something that would showcase the fabrics and not cut them up too small. After playing with EQ7 for a while, I came up with this:
It's a simple pattern and took me less than a week to put together. I cut all of the fabrics for the top in a couple hours and sewed the center of the top in one night. The second night I cut and sewed on the borders and then layered the "sandwich." It took me two nights to quilt it and one more to bind it and attach the label.
I used a varigated thread for the quilting and I free-handed those leaves on my sewing machine. I do not have a longarm quilter, but I have just this year gotten over my fear of free-motion quilting and am starting to really enjoy the process.


A label is a pretty personal thing and normally not something I would share, but in this case I'll make an exception.


Those words at the bottom that look like they're made up... well they are. That's a spell that we made up and somehow I've never forgotten. Did I mention we had vivid imaginations? :)

Saturday, August 7, 2010

An amazing artist

While collecting ideas for my fabric covered journal, I stumbled across an amazing find. I googled "fabric journals" to see what would come up and discovered this tutorial on making fabric journals. While they weren't the kind I was intending on, they were still absolutely gorgeous. The artist was Teesha Moore. A few more clicks and I came across her website and then her blog.

I literally lost about three hours of my night between watching the video tutorial and pouring over her art. Her journal pages are stunning! And she is so generous in sharing her art - not only does she offer all sorts of tips on her site but she runs several artist retreats and camps. I love it when artists make their art accessible.
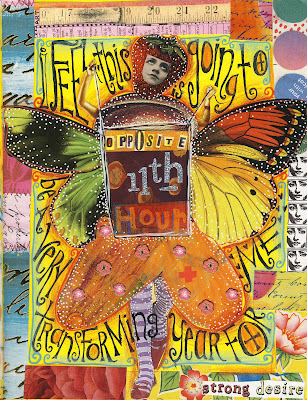
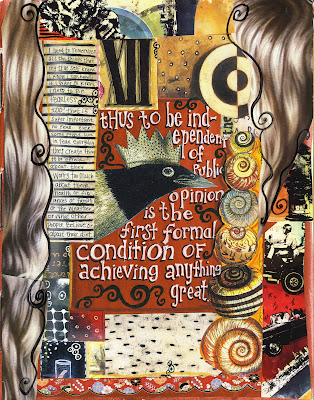
Here are a few more of my favorite Journal Pages of Teesha's:


I just can't get over the depth of her art - the bold use of color, all the layers and layers of details, and the personal tidbits and quotes. Her craft space is to-die-for. I love the color combo and her stash is one to be jealous of.

The technique Teesha Moore demonstrates in her videos seems pretty easy and versatile. It has inspired me to use her technique to finally start a wall quilt - something I've wanted to do for a while. We'll have to see what I come up with...